This is a quick tutorial and I may have made mistakes, if something doesn't make sense then leave a comment and I'll try to fix it up soon!
1. Download the newest version of the FGPS for your whatever version of Crysis you are using (either plain Crysis or Crysis Wars). I'm using Crysis Wars (this is what we are using in BENV2423) so I will be downloading and installing the Crysis Wars FGPS v1.1.0.5
Main FGPS Page: http://www.crymod.com/thread.php?postid=507997#post507997
Crysis Wars FGPS v1.1.0.5 Page: http://crymod.com/filebase.php?fileid=3402
2. Once you have downloaded the file double click it to begin installation. Remember, take your time to read everything on screen to make sure it makes sense! There is no point rushing into this and installing the FGPS in the wrong place!
3. Firstly, tell the installer where your Mods folder is located. My Mods folder is located at C:\Program Files (x86)\Electronic Arts\Crytek\Crysis Wars\Mods but this might be different for you so double check.
The installer will then ask you in what sub-folder it should install. Since this is the first time we are installing the FGPS we fill create a new folder by completing the Mod Name box. Name it something useful that makes sense to you like FlowgraphPluginSystem or FGPSMOD. I've chosen to use FlowgraphPlginSystem for this example.
It will then ask you if it should create a folder with the name you chose, click Yes.
If you are happy with everything Click install.
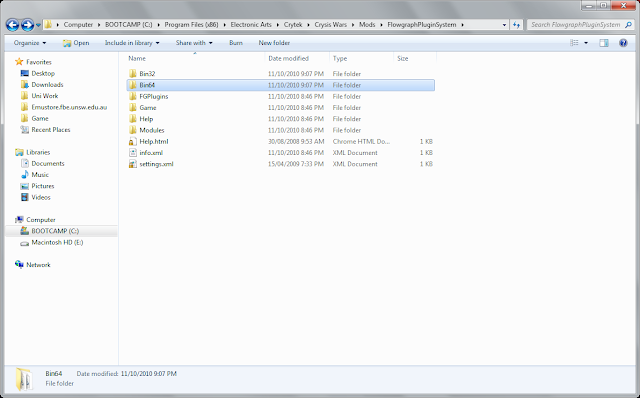
4. The next step is to navigate to where you have installed the FGPS, for me this is C:\Program Files (x86)\Electronic Arts\Crytek\Crysis Wars\Mods\FlowgraphPluginSystem
At this point I recommend you have a read of the accompanying help file which is called Help.html. It will help you understand more about the FGPS.
Once you have had a flick through the help files you can set up the Flowgraph Plugins. Flowgraph plugins are kept as .dll files. Flowgraph Plugins that come with the FGPS are held in the FGPlugins folder, this is merely a storage location and does not mean they are installed. To install any Flowgraph plugin you need to copy it into either the Bin32 or Bin64 (depending on what the plugin specifies) folder.
5. In the FGPlugins folder you will find the plugins which come with the FGPS. There are two versions of each, one is Bin32 and the other is Bin64. I'm going to copy both from the FGPlugins folder into the coresponding Bin folder in the root of the FGPS installation.
Also not that each plugin has its own readme file which I also recommend you read.
Also not that each plugin has its own readme file which I also recommend you read.
6. Copy all the plugins from the FGPlugin\Bin64 folder
7. Navigate to the Bin64 folder in the FGPS installation root.
8. And Paste them in. You have now installed the Bin64 plugins. Repeat steps 6 to 8 for the Bin32 folder if necessary.
9. You now need to make the Mod launch when you start the Sandbox Editor. To do this you need a shortcut to the Sandbox Editor on your desktop, you can make one by clicking Start > searching for Sandbox > Right-clicking to bring up the menu > selecting Send to > Desktop (create shortcut)
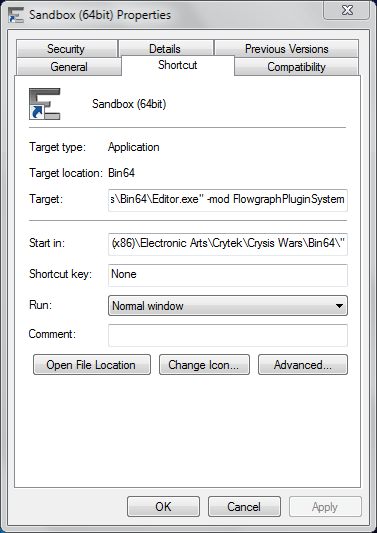
10. Now Right-Click the shortcut on your desktop and select Properties. You now need to add a condition that launches the Mod when you click the shortcut. This is done by typing -mod FlowgraphPliginSystem (Where FlowgrapghPluginSystem refers to the name you gave the mod). Be sure to leave one spacebar space before -mod. So as an example my Target is: "C:\Program Files (x86)\Electronic Arts\Crytek\Crysis Wars\Bin64\Editor.exe" -mod FlowgraphPluginSystem
Click Ok
11. You're done! Now launch Sandbox using the shortcut you just created and you should have a bunch of new nodes in your Flowgraph Editor!


No comments:
Post a Comment