Showing posts with label Flowgraph. Show all posts

Friday, November 5, 2010

RESEARCH ASSIGNMENT: INTRODUCTION TO THE FLOWGRAPH EDITOR

I had a very difficult time gaining a greater understanding of the Sandbox2 Flowgraph Editor between EXP1 & EXP2. I found that creating graphs required a certain mindset which was not helped by my lack of understanding of the Flowgraph Editor. Although a considerable amount of writing information exists on the Flowgraph Editor (including within official documentation) almost no visual tutorials explain the basics. Being a visual learner I found it very difficult to grasp what certain aspects within the Flowgraph Editor did and consequently spent a large portion of the time this semester figuring out what things did through trial and error. Small things like attaching Graphs to Entities instead of creating them separately took me a very long time to figure out. It is for this reason I chose to create a video tutorial that expanded on the basics & of course gave a visual presentation of the topic. Although Russel’s tutorial about Moving Entities does touch on some basics of the Flowgraph Editor I felt that more was necessary to give a better understanding for users to understand how to use the editor correctly. If this tutorial was available to me at the beginning of semester I would have been able to move along more quickly and produce more complex graphs earlier. I’ve included a number of links below which demonstrate the lack of video material on this topic. Using a variety of simple key words I search for tutorial and the flowgraph editor; my tutorial appears in all of them.


LINKS FOR BEGINNERS
http://www.youtube.com/watch?v=r0-zhMaecxQ
http://www.youtube.com/watch?v=nXcpobiKITQ
http://www.youtube.com/user/crymodportal#p/u
http://www.veoh.com/collection/officialSB2Tuts/watch/v6576568ReByyHfw
http://maxedgaming.com/tutorials/kb_categorie.php?id=10&sid=1595b26d0d9935f4772ba10fcfb1c36d

RECOMMENDED TUTORIALS
http://www.veoh.com/group/officialSB2Tuts
http://www.veoh.com/browse/videos/category/gaming/watch/v17308205SRsWdN2E
http://www.google.com/cse/home?cx=012680904516827000516:u4rw893h9vc
http://www.youtube.com/watch?v=mJ9u9NxSyBA

REFERENCES
http://doc.crymod.com/SandboxManual/
http://wiki.crymod.com/index.php/Creating_a_Flowgraph
http://wiki.crymod.com/index.php/Flowgraph_Guide
http://wiki.crymod.com/index.php/Flowgraph_Nodes
http://wiki.crymod.com/index.php/Flowgraph_Tips_and_Tricks
http://wiki.crymod.com/index.php/Sample_Flowgraph
http://www.crymod.com/thread.php?postid=507997#post507997

Wednesday, October 20, 2010

HOW TO INSTALL THE FLOWGRAPH PLUGIN SYSTEM (FGPS) FOR CRYSIS SANDBOX2

I've created this quick tutorial for people in BENV2423 who are having trouble installing the FGPS. It is a little bit of a process and can get a little confusing if you don't know what you are doing, so give yourself plenty of time to read the instructions and any accompanying documentation.

This is a quick tutorial and I may have made mistakes, if something doesn't make sense then leave a comment and I'll try to fix it up soon!

1. Download the newest version of the FGPS for your whatever version of Crysis you are using (either plain Crysis or Crysis Wars). I'm using Crysis Wars (this is what we are using in BENV2423) so I will be downloading and installing the Crysis Wars FGPS v1.1.0.5

Crysis Wars FGPS v1.1.0.5 Page: http://crymod.com/filebase.php?fileid=3402

2. Once you have downloaded the file double click it to begin installation. Remember, take your time to read everything on screen to make sure it makes sense! There is no point rushing into this and installing the FGPS in the wrong place! 


3. Firstly, tell the installer where your Mods folder is located. My Mods folder is located at C:\Program Files (x86)\Electronic Arts\Crytek\Crysis Wars\Mods but this might be different for you so double check.


The installer will then ask you in what sub-folder it should install. Since this is the first time we are installing the FGPS we fill create a new folder by completing the Mod Name box. Name it something useful that makes sense to you like FlowgraphPluginSystem or FGPSMOD. I've chosen to use FlowgraphPlginSystem for this example.


It will then ask you if it should create a folder with the name you chose, click Yes. 
If you are happy with everything Click install.


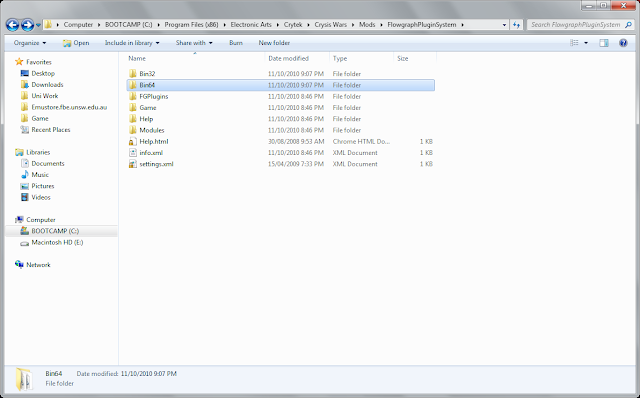
4. The next step is to navigate to where you have installed the FGPS, for me this is C:\Program Files (x86)\Electronic Arts\Crytek\Crysis Wars\Mods\FlowgraphPluginSystem

At this point I recommend you have a read of the accompanying help file which is called Help.html. It will help you understand more about the FGPS.


Once you have had a flick through the help files you can set up the Flowgraph Plugins. Flowgraph plugins are kept as .dll files. Flowgraph Plugins that come with the FGPS are held in the FGPlugins folder, this is merely a storage location and does not mean they are installed. To install any Flowgraph plugin you need to copy it into either the Bin32 or Bin64 (depending on what the plugin specifies) folder.


5. In the FGPlugins folder you will find the plugins which come with the FGPS. There are two versions of each, one is Bin32 and the other is Bin64. I'm going to copy both from the FGPlugins folder into the coresponding Bin folder in the root of the FGPS installation.

Also not that each plugin has its own readme file which I also recommend you read.


6. Copy all the plugins from the FGPlugin\Bin64 folder


7. Navigate to the Bin64 folder in the FGPS installation root.


8. And Paste them in. You have now installed the Bin64 plugins. Repeat steps 6 to 8 for the Bin32 folder if necessary.


9. You now need to make the Mod launch when you start the Sandbox Editor. To do this you need a shortcut to the Sandbox Editor on your desktop, you can make one by clicking Start > searching for Sandbox > Right-clicking to bring up the menu > selecting Send to > Desktop (create shortcut)

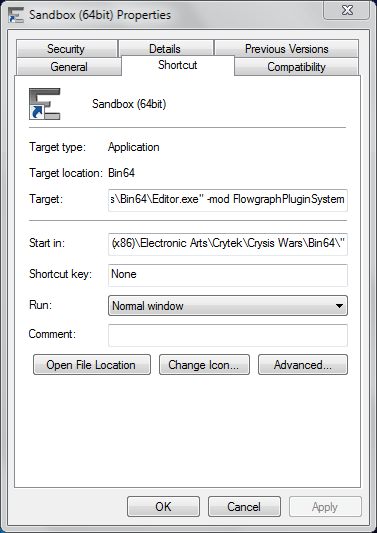
10. Now Right-Click the shortcut on your desktop and select Properties. You now need to add a condition that launches the Mod when you click the shortcut. This is done by typing -mod FlowgraphPliginSystem (Where FlowgrapghPluginSystem refers to the name  you gave the mod). Be sure to leave one spacebar space before -mod. So as an example my Target is: "C:\Program Files (x86)\Electronic Arts\Crytek\Crysis Wars\Bin64\Editor.exe" -mod FlowgraphPluginSystem


Click Ok


11. You're done! Now launch Sandbox using the shortcut you just created and you should have a bunch of new nodes in your Flowgraph Editor!

Monday, October 11, 2010

WEEK4: FLOWGRAPH - ATTACH EMITTER & MATERIAL OPACITY

Following the flowgraph image and demonstration from the lecture create two flowgraphs of your own; one that attaches an entity to your avatar and one that alters the opacity of an entity in response to your avatar.


ATTACH EMITTER


http://www.filefront.com/17379010/Crysis_Sandbox2_SpawnParticelEffect_flowgraph.xml

MATERIAL OPACITY


http://www.filefront.com/17379004/Crysis_Sandbox2_EntityOpacity_flowgraph.xml


Both the above image from lecture, Exp2 Week4 (TRACE + REPRESENTATION) - http://www.russelllowe.com/benv2423_2010/experiment2/reference/Lecture09_TraceAndRepresentation2010.pdf 

RESEARCH ASSIGNMENT: UNDERSTANDING THE FLOWGRAPH EDITOR


I am not a programmer, this is why I found the Sandbox2 Flowgraph editor a little hard to get my head around. The procedural programming thinking required to use the Flowgraph editor can be a little difficult to understand at first. Having to understand the Flowgraph editor itself at the same time didn't simplify the learning process for me. In fact, I'm still having trouble understanding the basics (like when is it best to assign a flowgraph to a entity or just create a general flowgraph!?). Something that has come to my attention is that no reasonable video tutorial exists to  cover the basics of the flowgraph editor. Although information regarding the topic is available on the internet, it is in various sources and not sometimes a bit difficult to follow.

Therefore for the Research Assignment I intend to cover the basics of the flowgraph editor, how to best configure the flowgraph editor, what it can be used for and explain some basic nodes and how to use them to create useful flowgraphs. I will then explain the best sources to learn more about the flowgraph editor.

Tutorial Topics:
a) Features of the Flowgraph editor
b) How to create a Flowgraph
c) Basic Nodes
d) Understanding the logic behind flowgraphs


Research Result
http://doc.crymod.com/SandboxManual/frames.html?frmname=topic&frmfile=index.html
http://doc.crymod.com/SandboxManual/frames.html?frmname=topic&frmfile=FlowgraphWindow.html
http://doc.crymod.com/SandboxManual/frames.html?frmname=topic&frmfile=FlowgraphNodeComposition.html

http://wiki.crymod.com/index.php/Flowgraph_Guide
http://wiki.crymod.com/index.php/Creating_a_Flowgraph
http://wiki.crymod.com/index.php/Flowgraph_Tips_and_Tricks
http://wiki.crymod.com/index.php/Sample_Flowgraph
http://wiki.crymod.com/index.php/Flowgraph_Nodes

http://www.youtube.com/watch?v=m52WBBNwx9U

Monday, September 27, 2010

EXP 2: THE 3D PICTURE

As part of my developing brief I am considering making exp2 completely 3D. This would not be a meaningless exercise as my intent is to further comment on how peoples interactions are influenced by architecture. I want the viewer to be conscious that what I am commenting on directly relates to them. Using a 3D shader within Crysis to emulate a 3D environment will hopefully allow me separate certain elements from others and highlight element that are closer than others.

With help from Russel I have been able to successfully install Xzero's zStereoscopic 3D (Red & Cyan) Shader and I've quickly outlined how I did this below:

1. Download the Shader: First you need to download the type of Stereoscopic Shader you wish to use. You have a choice between Red/Cyan, Amber/Blue, and Green/Magenta; which one you choose really depends on which type of 3D glasses you have laying around the house, check out the wikipedia page here. Like I said I used the Red/Cyan shader which I've reuploaded unzipped to filefront as the original .pak file.


You can also download it and the other shaders from Xzero's original upload which I've provided direct links to below:

Xzero's Red/Cyan Original Upload: http://crymod.com/attachment.php?attachmentid=71889

Xzero's Amber/Blue Original Upload: http://crymod.com/attachment.php?attachmentid=71890

Xzero's Green/Magenta Original Upload: http://crymod.com/attachment.php?attachmentid=71891


2. After downloading your desired shader you need to get the .pak file (which you will need to unzip if you downloaded Xzero's oringinal upload) and place it in your Game directory (C:\Program Files (x86)\Electronic Arts\Crytek\Crysis Wars\Game).


3. Once the ZStereoscopic3D.pak shader is in the Game Folder you need to load up your level in the sandbox editor and create a  Flow Graph by clicking View > Open View Panel > Flow Graph. Once the Flow Graph Editor is open click File > New

4. Then create the following two nodes by right clicking on the gray space

a)  Misc > Start
b)  Image > FilterGrain

5. Change the FilterGrain settings to Enabled and set an Amount to 13 (although Xzero suggests that anything between 5 & 10 works well). Once you have done this create the following Flow Graph: 


6. Your done! All you need to do now is get into the game and check it out, don't forget to put on your glasses! I'll try to upload a video in the next few days but here are some still captures for now: